
Lab Journey Part 1: DNS Sovereignty
Hooray my router arrived!
Happy days, my broadband is finally connected. Though it’s only FTTN and the down is around 56Mbps it’s workable. I have working internet … but not the way I would like.
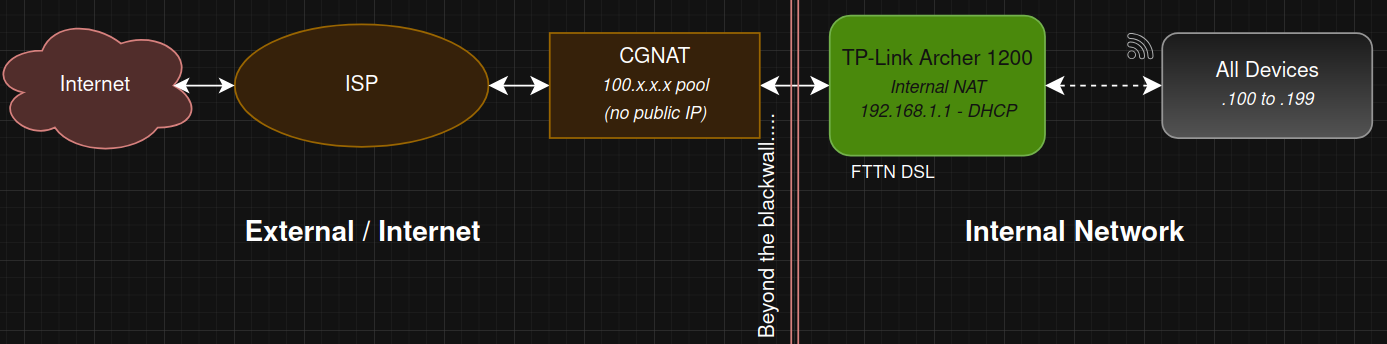
The Problem with this image..
I’ve got my router, and a connection … but every query my household makes is visible to my ISP. And further CGNAT means I am bundled in with my neighnours. I don’t really have a true presence on the internet.
My main goal is having a path to the internet so I can host services for both my own use and the use of my family (which means I don’t need to rent these services from big data).
Foundations
Before anything I need to do some foundational work…
Priority 1: Secure my router.
-
Step 1: Disable remote management. Why? Because I don’t want external connections to be able to manage my router.
-
Step 2: Disable UPnP. Why? Because I don’t want any forms of automation opening ports on my router.
-
Step 3: Disable WPS. Why? Because I want smart devices to authenticate like any other device has to.
-
Step 4: Change Default Admin Creds. Why? 90% of domestic routers are still configured with admin|admin. Don’t be like them.
Priority 2: Getting a real IP.
Easy one. Call the ISP. Request my account be taken off CGNAT. *A good ISP can process this quickly. I declined the upsell to a static IP as I plan to solve this with DDNS later.
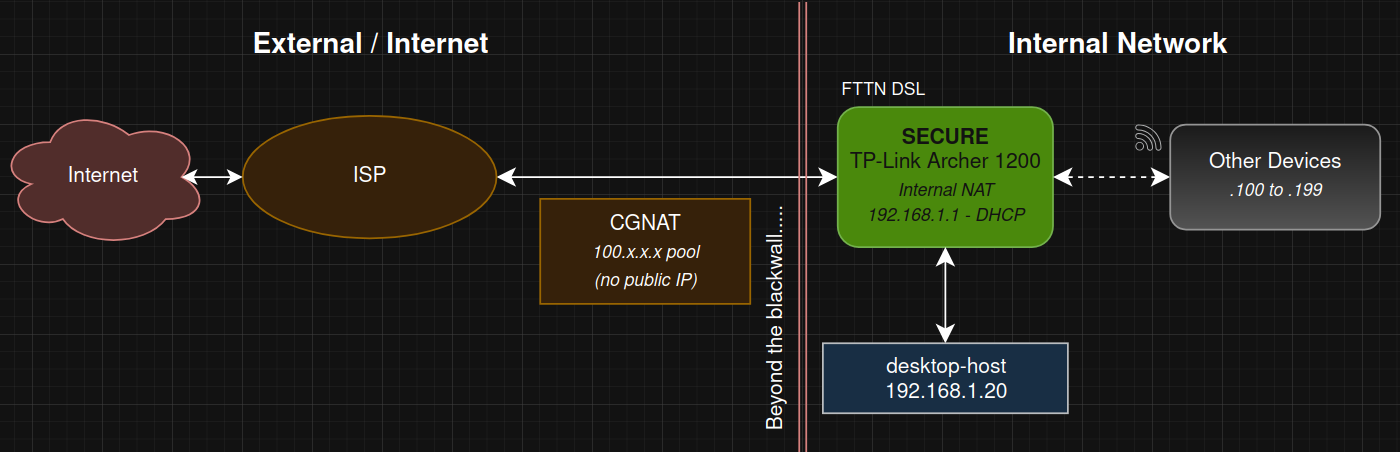
30 minutes after this call, a quick router power cycle and I am no longer assigned a CGNAT pool IP.
Priority 3: Static Lan IP
As I plan on hosting services on my desktop until I get my full lab compute setup; I need a static IP Address. This is simple enough. Get my MAC address:
ip link show <interface>And now just add my hosting machine to the address reservation list on my router. Note: make sure to give myself an address outside of the DHCP assignable range (usually .100 - .199). I went with .20
Priority 4: Automation & Structure
The older I get the more I realise how fallible my memory is. This also comes with the wisdom that if I am sitting at a computer I don’t need to remember everything. I run something … it works … then I am going to script it up.
The idea: A folder for each service. A docker compose file within each folder. A start.sh script with an alias that cycles through the compose files.
~/Lab/
    start.sh
    service/
        docker-compose.yml
With the above structure I can script up my docker composes and alias it to something nice so calls go like this:
lab up
lab restart
lab logs
# etc...
(This is done but the full script is beyond the scope of this post)
Here is what my network looks like now:
Middle Finger #1: Pi-hole
Currently DNS queries would be routed through whatever my ISP assigns as the default. This would in the large majority of cases be their own DNS servers that cache requests for the nodes they service. For domains they are unsure about they forward up the chain to recursive resolvers and then onwards.
The plan here —> use Pi-hole to catch all the queries for any well known adverts, tracking or other unwanted queries and reject them BEFORE they get sent to the ISP. This way, every device on my home network (smart-tv, partner’s laptop, phone), gets these queries blocked.
Pi-hole comes with its own blocklist (with > 80k domains) that block a good amount of trash. This means sites serving ads that are not a part of their own CDN are usually blocked. Ever tried to use a wiki site and been bombarded with ads? This fixes that issue.
A limitation: For services that feed ads through their own CDN or Domain Resolution (like youtube) Pi-hole doesn’t help. You still get the usual ads on youtube and will need a separate ad-blocker to combat this.
Read more here: Pi-hole docs
The setup:
- Make new dir for pihole image and yml file for docker compose
mkdir -p ~/Lab/pihole && cd ~/Lab/pihole
touch docker-compose.yml- Pihole specifics for docker
services:
    pihole:
        image: pihole/pihole:latest
        container_name: pihole

        # Host networking lets Pi-hole bind directly to port 53 on the machine's
        # IP. Bridge mode would require explicit port mapping and complicates
        # DNS-over-localhost with Unbound which comes next.
        network_mode: host

        environment:
            TZ: Australia/Sydney

            # Admin UI password. Change this.
            FTLCONF_webserver_api_password: "changeme"

            # Upstream to cloudflare to bypass ISP DNS.
            # We will be enhancing this later with unbound.
            FTLCONF_dns_upstreams: "1.1.1.1"

        volumes:
            # Blocklists, custom DNS entries, and Pi-hole's query database.
            - ./etc-pihole:/etc/pihole
            # dnsmasq config overrides. Mostly managed by Pi-hole but exposed here
            # in case you need to drop in custom DHCP or DNS options.
            - ./etc-dnsmasq.d:/etc/dnsmasq.d

        # Restart on failure but not on explicit `docker stop` (e.g. lab down).
restart: unless-stopped- Run it!
docker compose -f ./docker-compose.yml up -dThen we confirm that pihole is up and running:
watch docker ps -aThen just need to go into my router and update our DHCP settings in order to serve my new pihole server as the DNS provider (and it will upstream my DNS requests to 1.1.1.1). So I go in and set the Primary DNS to 192.168.1.20 (where pihole lives).
Then, after a quick router reboot, I now have some nice DNS level filtering that covers the entire network. My internal network is now looking something like this:
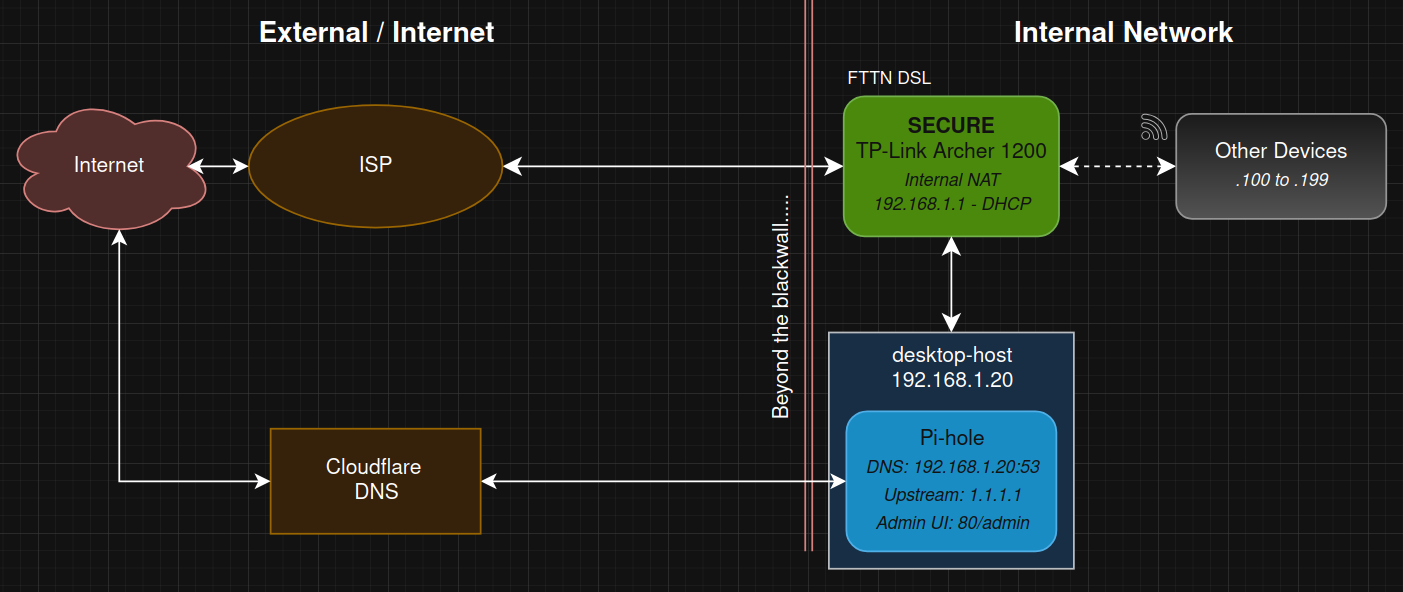
I can confirm pihole is up and running by navigating to 192.168.1.20/admin and using the password specificed in the docker-compose. This also gives a lot of nice info about the work pi-hole is doing for my network.
What to do about 1.1.1.1?
1.1.1.1 is cloudflares recursive resolver, google also has one at 8.8.8.8. They are fast, free, and handle all of our DNS queries.
They resolve domains by walking a three level DNS hierarchy: Root Nameservers -> TLD Nameservers -> Authoritative Nameservers. In essense, when you type www.google.com into your browser it first sends its request to my local pihole. Google is not on the blocked list so it sends the request upstream to 1.1.1.1.
1.1.1.1 receives the request and, assuming it doesn’t already have the answer cached, begins a recursive lookup.
First it asks the Root servers -> where do I go for .com? And gets a TLD server back.
Then it asks the TLD server -> where do I go for google.com? And gets an authoritative server back.
Then it asks the authoritative server -> what is the IP address for www.google.com?
1.1.1.1 then returns that ip to my Pi-hole and then back to my browser.
But 1.1.1.1 is still getting a look at all our traffic? What if I could operate my OWN recursive resolver? Enter UNBOUND…
Middle Finger #2: Unbound
It should be pretty clear the goal now. I can just run my own recursive resolver! Then the three hop walks comes from my internal network with no upstream. This way I am taking as much control as possible of my DNS queries.
The setup:
- Make new dir for pihole image and yml file for docker compose
mkdir -p ~/Lab/unbound && cd ~/Lab/unbound
mkdir -p ~/Lab/unbound/conf.d && touch ~/Lab/unbound/conf.d/custom.conf
touch docker-compose.yml- Pihole specifics for docker
# docker-compose.yml
services:
    unbound:
        image: klutchell/unbound:latest
        container_name: unbound

        # As with Pi-hole: host networking lets Unbound share the
        # network stack so Pi-hole can reach it on 127.0.0.1:5335.
        network_mode: host

        volumes:
            # Full config override. The port binding lives in here, not in compose.
            - ./conf.d/custom.conf:/etc/unbound/unbound.conf:ro

        restart: unless-stopped
# ./conf.d/custom.conf
server:
# Required when running in a container -> Unbound must stay in the
# foreground or the container exits immediately.
do-daemonize: no
# Bind to localhost only on port 5335. Pi-hole owns 53.
interface: 127.0.0.1@5335
# Allow queries from localhost and the local network.
access-control: 127.0.0.1/32 allow
access-control: 192.168.0.0/24 allow
# Needed to query Pi-hole or other local resolvers if required.
do-not-query-localhost: no
# Don't expose the hostname or version in DNS responses.
hide-identity: yes
hide-version: yes
# Fetch records before TTL expires to keep cache warm.
prefetch: yes
# Cache bounds in seconds. 5 min floor, 24 hour ceiling.
cache-min-ttl: 300
cache-max-ttl: 86400
# Never return private IP ranges in responses to prevent rebinding attacks.
private-address: 192.168.0.0/16
private-address: 172.16.0.0/12
private-address: 10.0.0.0/8- Run it!
docker compose -f ./docker-compose.yml up -dNow just a small tweak to the pihole config and a restart.
sed -i 's/1.1.1.1/127.0.0.1#5335/' ~/Lab/pihole/docker-compose.yml
cat ~/Lab/pihole/docker-compose.yml #sed fragile, always confirm!
docker compose -f ~/Lab/pihole/docker-compose.yml up -d
Then we confirm that both unbound & pihole are up and running:
watch docker ps -aLogging into pihole shows that it’s active and is sending DNS queries to our unbound resolver!
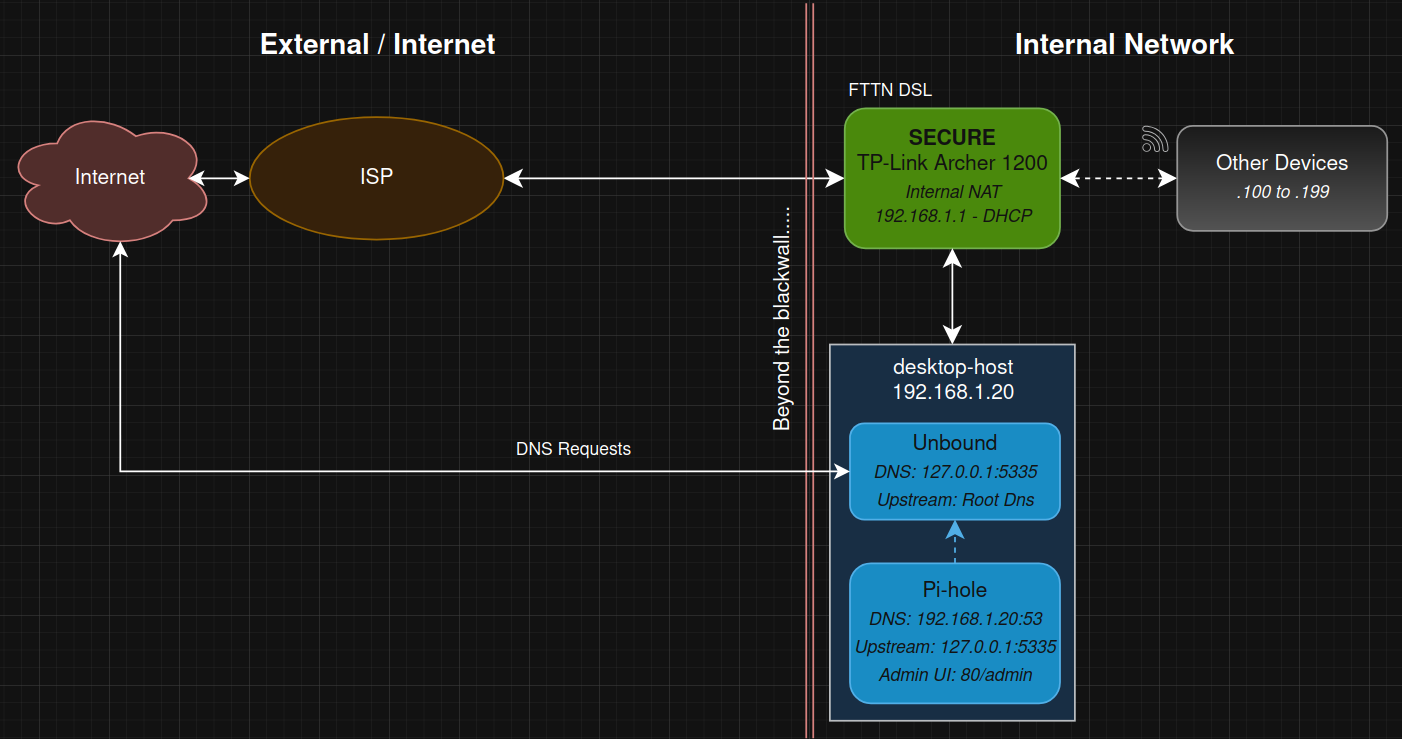
What I Have Now
I started with just a box with internet access … and now I have somewhat wrested control over my DNS back from the ISP. Queries for known ad and tracking domains get dropped before they even leave the internal network. And the ones that do need resolution I resolve directly against the higher tier sources - no middleman.
Accomplishments:
- Secure Router
- Dedicated internal IP
- Pi-hole setup: network-wide ad blocking and full query visibility on my own terms
- Unbound setup: recursive resolution with no upstream dependency
One honest caveat: this all runs on my desktop. Desktop reboots, DNS dies for the whole network until it comes back up. When I can afford compute seperate from my PC I plan to set this things up on dedicated always on hardware. But for now this works.
What’s Next
I now have a real public IP and a DNS stack under my control. The next question is how to actually expose some services to the internet that are useful. But first I want to focus on security a bit…
The next post in this series I plan to cover Cloudflare Tunnel and Authelia. This allows external access to self-hosted services, no open ports, with authentication in front of everything.
Some terms for the non-network-inclined:
You and your housemate are chilling on your home network. You want to browse some “tasteful” tiktoks … and your housemate wants some cat photos. You both connect to the wireless network, but your router needs to be able to identify you both internally. DHCP!
DHCP: Dynamic Host Config Protocol —> Assigns IP and network settings to a device connecting to the network.
Solved! You start browsing some saucy images and your mate some cute cat photos. Your router goes out into the internet and grabs what you asked for and brings it back. But now how does it know who gets what after it’s retrieved? NAT!
NAT: Network Address Translation -> allows multiple devices on the same internal network to share one public IP address.
Now over in ISP land … oh shit boss, we are running out of IPv4 numbers to assign to all these households. I’ve got an idea! Let’s just do NAT but at the carrier level. CGNAT!
CGNAT: ISP level NAT to share a single public IPv4 address across MULTIPLE households (as there are not enough IPv4 addresses to go around)
The NBN contractor rocks up to your suburb and asks the boss: “Do we dig fibre all the way to every house, or stop at the street cabinet and use the old copper for the last stretch?” The boss checks the budget and starts sweating…
FTTN Fibre To The Node -> Fibre runs to a street cabinet (“the node”), then existing copper phone lines connect the node to your home.
Some lucky bastard in the next suburb gets the deluxe package. Fibre runs directly into their house. No old copper. No street cabinet. Just glorious glass all the way.
FTTP Fibre To The Premises -> Fibre optic cable runs directly from the network into your home.
Back in the early days of the internet, someone says: “Four billion addresses should be enough for everyone.” Fast forward a few decades and now your fridge wants internet access, your light bulbs want internet access, and apparently your toothbrush needs a software update.
IPv4: Internet Protocol Version 4 -> The addressing system used by most of today’s internet. Provides roughly 4.3 billion unique addresses.
You and your housemate both get IP addresses from DHCP. Great. But what happens if your computer disconnects and reconnects tomorrow? You might get a different IP. The router needs a way to identify the actual piece of hardware sitting on the network.
MAC: Media Access Control Address -> A unique hardware identifier assigned to a network interface.